This is a comprehensive guide about installing SDK 2013 Singleplayer with Mapbase.
------------------------------------------------------------------------------------------------------------------------------------------------------
We will firstly be following the tutorial made by Jesse "Wazanator" Culver on installing the SDK 2013
Singleplayer, after which we will install mapbase itself.
Requirements
- Source code for the 2013 branch
- Visual Studio 2013 Community Edition (scroll down to 2013, click Download, and sign in with your Microsoft account)
- Multibyte MFC Library install AFTER VS 2013 has been installed.
- Source SDK Base 2013 Single Player on Steam (Install the "upcoming" beta)
- Notepad++ or another editor which isn't the default notepad of windows.
- Microsoft Speech SDK 5.1 Pick SpeechSDK51.exe
- Mapbase release build from ModDB
- Mapbase compile tools
*** Fixing a bug with VS 2013 not connecting to the register API ***
 This part is not fixed into the original tutorial, however it is a useful quickfix for whomever is experiencing this bug. The main bug is the VS software not being able to read strong cryptography. So do as follows:
Keystroke Windows key + R, this will bring up a run window, type "regedit", navigate over to "HKEY_LOCAL_MACHINE\SOFTWARE\Wow6432Node\Microsoft\.NetFramework\v4.0.30319", add a new "DWORD" registry entry named SchUseStrongCrypto and set it's value to 1
This part is not fixed into the original tutorial, however it is a useful quickfix for whomever is experiencing this bug. The main bug is the VS software not being able to read strong cryptography. So do as follows:
Keystroke Windows key + R, this will bring up a run window, type "regedit", navigate over to "HKEY_LOCAL_MACHINE\SOFTWARE\Wow6432Node\Microsoft\.NetFramework\v4.0.30319", add a new "DWORD" registry entry named SchUseStrongCrypto and set it's value to 1

 Now upon launching VS 2013 the login window should work.
i have found out that the tutorial has a moreover duct-tape approach to installing mapbase, i will rewrite this tutorial sometime soon.
*** Setting up the work directory ***
Create a folder which we will use for the code part of our mod, but do make sure that it does not have
spaces in it's name, as that will cause issues.
 Make a new folder called "code" in the folder that we just created. And unzip the archive copy of the Source code for the 2013 branch, you will see
two directories, sp and mp, we only need the sp folder so simply delete the mp folder.
Make a new folder called "code" in the folder that we just created. And unzip the archive copy of the Source code for the 2013 branch, you will see
two directories, sp and mp, we only need the sp folder so simply delete the mp folder.

*** Setting up the Mod Directory ***
Navigate to your primary Steam folder, or simply, where steam.exe is located, then enter the steamapps directory, then the sourcemods directory.
Here, create a folder with the name of your mod.
 Upon entering the mod directory you made, you'd have to make the following directories:
- bin
- cfg
- maps
- mapsrc
- materials
- models
- resource
- scripts
- sound
Upon entering the mod directory you made, you'd have to make the following directories:
- bin
- cfg
- maps
- mapsrc
- materials
- models
- resource
- scripts
- sound

*** Setting up Microsoft Speech SDK (SAPI) ***
Run the SpeechSDK51.exe file we downloaded earlier, it should unzip itself in a directory of your choice, there will be a handful of files, one of them will be Microsoft SDK 5.1.msi.
Running this with the default settings should create a directory called Microsoft Speech SDK 5.1 in your Program Files (x86) directory. Copy that directory and it's contents into \sp\src\utils of your mods source code directory and rename it to sapi51.
 In sp\src\utils\sapi51\Include open up the sphelper.h file in Notepad++ or another text editor.
The following changes need to be made to it:
- Line 769: const size_t ulLenVendorPreferred = wcslen(pszVendorPreferred); // no size_t
- Line 1418: static long CoMemCopyWFEX(const WAVEFORMATEX * pSrc, WAVEFORMATEX ** ppCoMemWFEX) // missing long
- Line 2368: const WCHAR * PropertyStringValue() const
{
// Search for the first NULL and return pointer to the char past it.
SPDBG_ASSERT(eEventId== SPEI_PROPERTY_STRING_CHANGE);
const WCHAR * psz= (const WCHAR *)lParam; // moved this from for init
for (; *psz; psz++) {}
return psz + 1;
}
- Line 2560: SPPHONEID* pphoneId = (SPPHONEID*)((WCHAR *)dsPhoneId); // improper casting
- Line 2634: pphoneId += wcslen((const wchar_t *)pphoneId) + 1; // improper casting
In sp\src\utils\sapi51\Include open up the sphelper.h file in Notepad++ or another text editor.
The following changes need to be made to it:
- Line 769: const size_t ulLenVendorPreferred = wcslen(pszVendorPreferred); // no size_t
- Line 1418: static long CoMemCopyWFEX(const WAVEFORMATEX * pSrc, WAVEFORMATEX ** ppCoMemWFEX) // missing long
- Line 2368: const WCHAR * PropertyStringValue() const
{
// Search for the first NULL and return pointer to the char past it.
SPDBG_ASSERT(eEventId== SPEI_PROPERTY_STRING_CHANGE);
const WCHAR * psz= (const WCHAR *)lParam; // moved this from for init
for (; *psz; psz++) {}
return psz + 1;
}
- Line 2560: SPPHONEID* pphoneId = (SPPHONEID*)((WCHAR *)dsPhoneId); // improper casting
- Line 2634: pphoneId += wcslen((const wchar_t *)pphoneId) + 1; // improper casting
*** Setting up the Codebase and Compiling it ***
Navigate to the code directory we made, and then navigate over to sp/src.
Run creategameprojects.bat and you will see it makes a games.sln
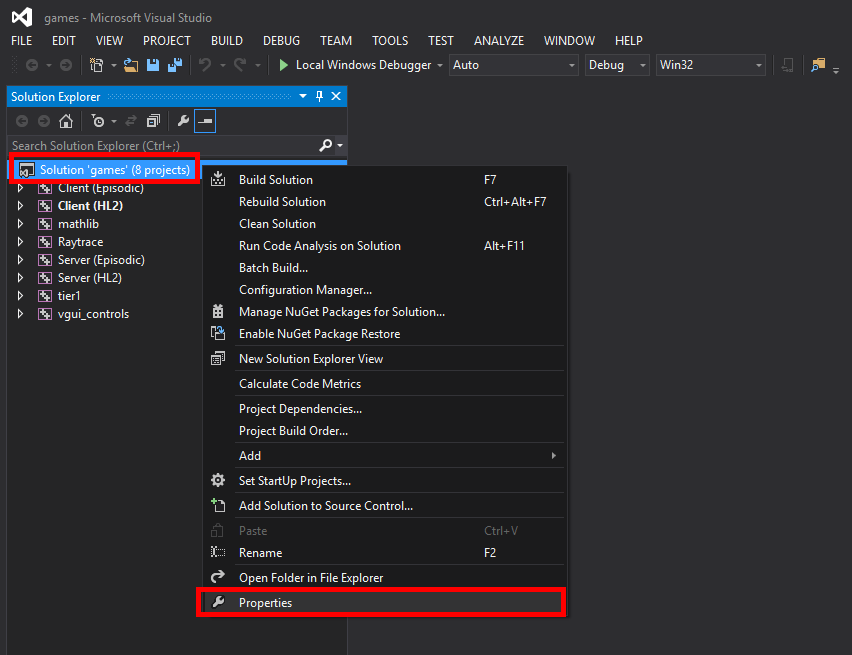
 Open up this file with VS 2013, and right click "Solution 'games' (8 projects)" in the solution explorer and choose "Properties"
 On the left side of the properties menu click on "Configuration" under "Configuration Properties" and then click "Configuration Manager..." in the upper right.
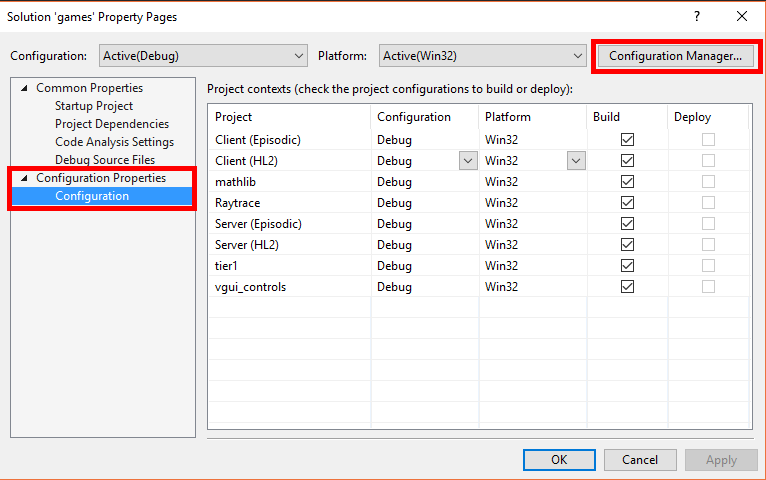 In the "Configuration Manager" under "Active solution configuration": choose "Release" from the drop down.
 Click "OK" to close both menus.
In the top menu bar, click "Build", "Rebuild Solution" and wait for the build to finish.
Click "OK" to close both menus.
In the top menu bar, click "Build", "Rebuild Solution" and wait for the build to finish.
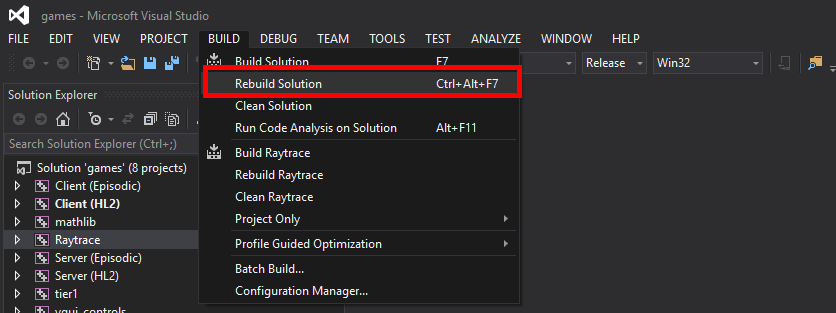 If everything was setup properly you will get a nice output that tells you that there were 8 successes, 0 fails, and 0 skips.
*** Getting the Binaries ***
Your mod needs both a client.dll and server.dll to run properly which is why we compiled the code earlier. Compiling the code gives us binaries for the engine to use.
We will automate this process by editing the post-build events of the Client and Server solution of our code.
Open up games.sln and right click "Client (Episodic)" in the "Solution Explorer" and select "Properties".
On the left side you will have to look for "Build events", expand that and click on "Post-Build Event"
 Click on the dropdown of "Command line" and choose "Edit...".

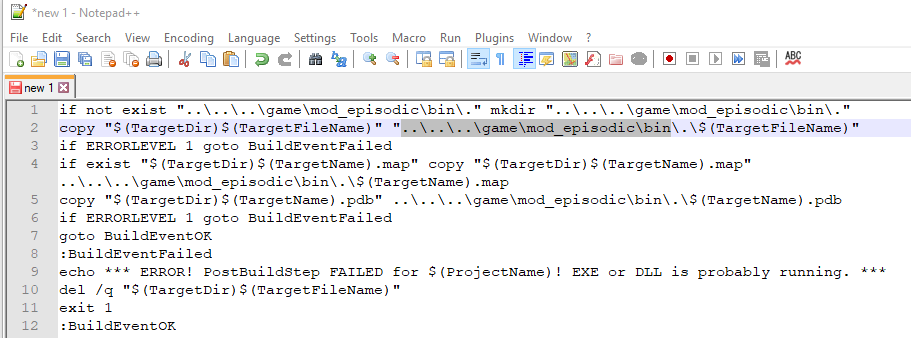
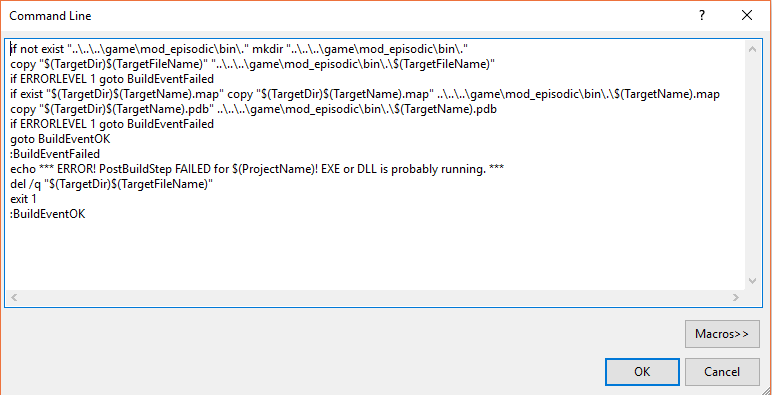 A window titled Command Line will open up, inside of it is the batch script that will run after it is done compiling.
This line of the script is saying "Copy the dll into a directory." That directory is 3 levels up from where you are now (..\..\..\) and then down into game\mod_episodic\bin\. and the copied file is still going to have the same name as the original, $(TargetFileName).
We of course want the dll's going into our mods bin directory so let's change this. To start select the entire script and copy it into a editor like Notepad++.
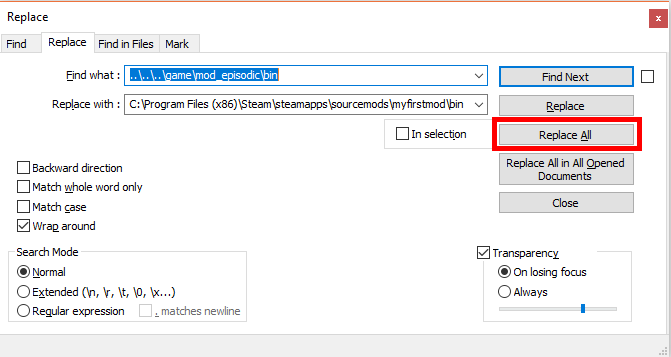
Select the text ..\..\..\game\mod_episodic\bin and press CTRL+H to bring up the Find Replace feature of Notepad++, if you are using a different text editor it most likely has the exact same function with a different hotkey.
We now want to replace all instances of ..\..\..\game\mod_episodic\bin with our mods bin directory. In my case that is C:\Program Files (x86)\Steam\steamapps\sourcemods\myfirstmod\bin and then press "Replace All".
Please also make sure that if you directory path has any spaces, mark the path with quotation marks as so: "C:\Program Files (x86)\Steam\steamapps\sourcemods\myfirstmod\bin"
A window titled Command Line will open up, inside of it is the batch script that will run after it is done compiling.
This line of the script is saying "Copy the dll into a directory." That directory is 3 levels up from where you are now (..\..\..\) and then down into game\mod_episodic\bin\. and the copied file is still going to have the same name as the original, $(TargetFileName).
We of course want the dll's going into our mods bin directory so let's change this. To start select the entire script and copy it into a editor like Notepad++.
Select the text ..\..\..\game\mod_episodic\bin and press CTRL+H to bring up the Find Replace feature of Notepad++, if you are using a different text editor it most likely has the exact same function with a different hotkey.
We now want to replace all instances of ..\..\..\game\mod_episodic\bin with our mods bin directory. In my case that is C:\Program Files (x86)\Steam\steamapps\sourcemods\myfirstmod\bin and then press "Replace All".
Please also make sure that if you directory path has any spaces, mark the path with quotation marks as so: "C:\Program Files (x86)\Steam\steamapps\sourcemods\myfirstmod\bin"
 And it should now look something like this:
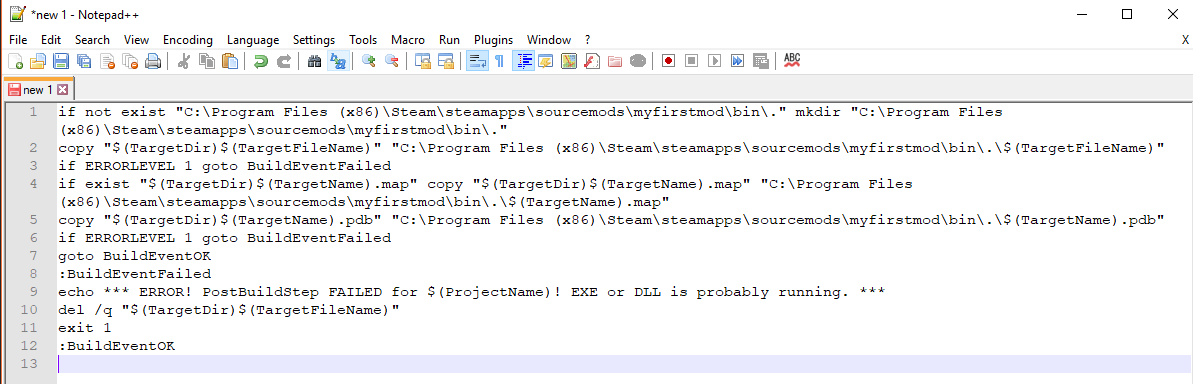 Select all of your modified script and copy it back into the Visual Studio Command Line window and press OK to close the window. Press OK again to apply and close the Properties Page of Client (Episodic).
You now need to do the exact same thing for Server (Episodic) but the good news is you can just reuse the same exact script you modified.
Now if you do a rebuild you will see it puts the dlls into your mods bin directory!
Select all of your modified script and copy it back into the Visual Studio Command Line window and press OK to close the window. Press OK again to apply and close the Properties Page of Client (Episodic).
You now need to do the exact same thing for Server (Episodic) but the good news is you can just reuse the same exact script you modified.
Now if you do a rebuild you will see it puts the dlls into your mods bin directory!
*** Gameinfo.txt Setup ***
The gameinfo.txt is a very important part of any Source Engine mod and game. This file tells the engine and Steam not only what your mod is called but what files to mount.
In your mod directory create a file called gameinfo.txt and copy the following into it:
Be sure to change the values for game and title to match your mods name!
*** The CFG Directory ***
The CFG directory is where you will keep all of your config files for the game. A .cfg file is simply a file that contains commands that will get run when executed.
In your mod directory (sourcemods/myfirstmod) open your cfg folder and create the following .cfg files.
- modsettings.cfg, runs when the mod starts up
- game.cfg, runs on every map load
- skill.cfg, contains the console variables for various settings for NPC's and weapons
- skill_manifest.cfg, this is used to run multiple skill.cfg files
- config_default.cfg, the default keybinds
- chapter#.cfg, ran when the player picks that chapter # from the main menu. Normally it's to load the proper map.
You may also use some of Half-life 2's examples:
- Half-Life 2's skill.cfg
- Half-Life 2 EP2 skill_episodic.cfg
- skill_manifest.cfg
- Half-Life 2 chapter1.cfg
- config_default.cfg
*** You're Done! (with the main mod, not mapbase) ***
Upon restarting steam you should see your game in the library.
*** Mapbase Setup ***
Now, we will have to install mapbase onto the mod to work independently when downloaded.
Navigate to your mod directory (sorucemods/myfirstmod). Here, make a new directory called "mapbase", unzip the Mapbase release build archive here. You should see three folders, which you will have to rename by removing the "mapbase_" part of their name.
 Now, open up the "shared" folder and enter "shared_misc/bin", you will find three .fgd files, those files need to be moved to the "sourcemods/myfirstmod" directory.

*** Hammer Editor Setup ***
To make a decent mod with gameplay, you'd have to make maps for it, Hammer Editor does just that.
To setup Hammer Editor to work with the new entities that Mapbase has to offer, aswell as your mod itself you'd have to do the following:
Navigate over to "C:\Program Files (x86)\Steam\steamapps\common\Source SDK Base 2013 Singleplayer\bin" and unzip your "Mapbase Compile tools" archive here. Accept the replacements, as of right now, we have installed the compile
tools that Mapbase requires.
In the same folder, open gameconfig.txt.
 Add this into the textfile, replace all the "MOD" text with the correlating text of your choice.
Now, upon opening "hammer.exe", click Tools > Options, then click "Game Configurations". Choose your mod name that you put in gameconfig.txt, and click "Add". You should now browse to your mod directory (sourcemods/myfirstmod) and select base.fgd, do the same for hl2mp.fgd and halflife2.fgd.
Add this into the textfile, replace all the "MOD" text with the correlating text of your choice.
Now, upon opening "hammer.exe", click Tools > Options, then click "Game Configurations". Choose your mod name that you put in gameconfig.txt, and click "Add". You should now browse to your mod directory (sourcemods/myfirstmod) and select base.fgd, do the same for hl2mp.fgd and halflife2.fgd.


*** You're Done! (for real this time) ***
You have just created your first Mapbase mod! Fantasy is your only limit now! (and max brush sides)
If you stumble upon any errors, bugs or problems, google them and only then post them on the Source Engine Discord.
For neat resources, check out https://catboxed.neocities.org/hammer/cheatsheet.html
14/08/2022 |